Rancher 2
Rancher is a Kubernetes management tool to deploy and run clusters anywhere and on any provider.
The following page can only cover some special topics. Please read the official Rancher documentation to learn more about Rancher 2 and how to perform container management.
Role mapping
No special permissions are assigned to Portal Admins. Currently, the only users with elevated permissions are users with at least one Project Admin role. For more info check out the Roles chapter.
Project Role | Rancher 2 Global Role | Description |
|---|---|---|
Admin | Standard User | These users can create new clusters and use them. Standard users can also assign permissions for their clusters to other users. |
Master | User-Base | User-Base users have login-access only. But they can be added to clusters and namespaces. |
Developer | ||
Viewer |
Login to Rancher
As a first step, go to the Projects page in the DevOps Portal, then click on Rancher2 in the Tools column of one of your projects:

Then login to Rancher using the Keycloak option.

Click on the "Log in with Keycloak" button as shown in the above screenshot.
After you logged in, the welcome page will look different depending on the level of access you have.
These are the two options:
- If you have at least one Project Admin Role you get Standard User global permissions in Rancher. This will also show the "Import Existing" and "Create" button (for adding a cluster) as seen in the screenshot below:

- If you have no Project Admin Role, you get User-Base global permissions in Rancher. This means you cannot add new clusters. You will only see clusters for which somebody else has assigned you some permissions. The screenshot below shows how the welcome screen will look like:

Roles
Global Roles
As mentioned, users will be a member of one of the following two Global Roles which contain Global Permissions.
Display Name | Name | Permissions |
|---|---|---|
User-Base | user-base |
|
Standard User | user |
|
For more information regarding roles and permissions for Rancher 2 please access the following link: https://ranchermanager.docs.rancher.com/
Cluster and Project Roles
Global roles are assigned based on the project role in the DevOps portal. In addition, roles at cluster or "project" level can be assigned, too. These roles are assigned within the Rancher UI and are not derived from any role in the DevOps portal.
Cluster Roles
Cluster roles define permissions for individual users for a specific cluster, see this Link for further information from Rancher.
If roles shall be assigned to created or imported clusters, then follow this procedure:
- Go to the Rancher homepage, where you see the list of managed clusters
- Click on the "Manage" button, the Cluster Management page is opened
- Click on the 3 dots on the right side of the line with the intended cluster → Click on "Edit config"
- Extend "Member Roles" and Click on "Add Member".

- Start typing the full name of the user. There should be a suggestion displayed. Click on it.
- In the role field, choose one of the built-in roles, see this Link for the description of permissions per role.
- Click on Save at the bottom of the page.
Project Roles
Within a cluster, roles can be assigned for individual Rancher projects. This allows a more granular permission assignment within a cluster. See this Link for further information.
Follow this instruction to assign project roles to individual users:
- In Rancher UI, switch to the cluster in which a project role shall be assigned.
- In the menu on the left side, click on Cluster/Projects+Namespaces.
- Switch to "Group by Project" presentation

- Search and find the project, for which you want to assign roles
- In the line of this project (not the line with a namespace), click on the 3 dots on the right side → Click on Edit Config
- Click on the Add (Members) button

- Start typing the full name of the user in the Select Member Field. There should be a suggestion displayed. Click on the entry with the full name (Local)
- In the Project Permission field, select the intended role, see this Link for further information.
- Click on "Add".
- Click on "Save" at the bottom of the page when all intended users have been are added.
Helm charts
Add public helm chart
In this section, we describe how to add public helm charts like the one of DevOps-as-a-Service to a cluster to allow manual deployments.
Create Chart Repository in Rancher
In Rancher UI, switch to the intended cluster and go to Apps/Repositories using the left side menu.
Create a new Repository by clicking the Create button.

To add public oci-repository, navigate to repository create button and click it. For target, use OCI Repository like shown below:
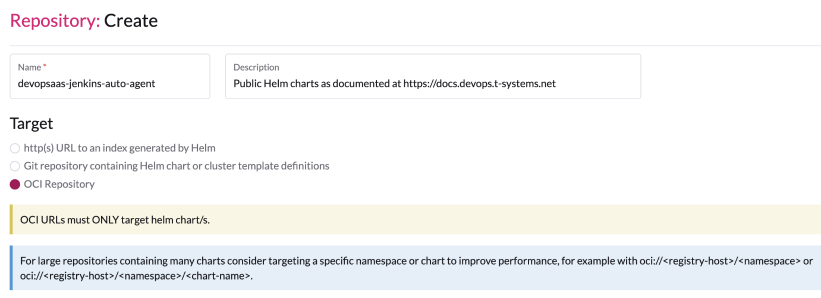
In the "Repository: Create" dialog, simply fill in the following fields. Authentication is not required.
Field | Value |
|---|---|
Name | devopsaas-jenkins-auto-agent |
Description | Public Helm charts as documented at https://docs.devops.t-systems.net |
Index URL | oci://registry.sdc.t-systems.net/devopsaas-helm/<chartname>, for example: oci://registry.sdc.t-systems.net/devopsaas-helm/jenkins-auto-agent Take into account, that all internal harbor repositories with helm charts have PKEY-helm naming convention, adding repo with both docker images and helm charts is not supported in rancher. |
Deploy Helm charts
Now go to Apps>Charts and filter if necessary for the devops-as-a-service Helm chart repository. Like shown below, a list of available charts is displayed. Simply click on one of the tiles to deploy them to your cluster.
Please note that the jenkins-lib charts are only generated for testing purposes. It doesn't make sense to deploy them. Your Jenkins is automatically retrieving the Jenkinslib directly using Git.

Add private chart repository
Create a robot account in Harbor
To add project specific helm charts to Rancher, a Harbor robot account is needed, that is able to read helm charts and pull repositories. If you don't have such an account yet, please follow the instructions given in the Create Robot Account section of the Harbor documentation and make sure to grant at least the following permissions:
- Read Artifact
- Pull Repository
Create App Repository in Rancher
In Rancher UI, switch to the intended cluster and go to Apps/Repositories using the left side menu.
Create a new Repository by pressing the Create button.
Choose OCI repository in Target and for url, use oci://registry-<domain>.devops.t-systems.net/<project>-helm/<chartname>
Replace <domain> , <project> and <chartname> as necessary to match your set-up. Your charts should be stored in <project>-helm repository in Harbor, which is created by default when project is created in portal.
For Authentication, select "Create a HTTP Basic Auth Secret" and provide the Username and Password of the Harbor robot account from the previous section.

Click Create.
Field | Value |
|---|---|
Name | sdcloud-sdportal |
Description | Sdportal charts of sdcloud project |
Index URL | oci://registry.sdc.t-systems.net/sdcloud-helm/sdportal |
Migrating chart repositories in rancher to new OCI Repository format
All your charts are available in the corresponding `<pkey>-helm` OCI project.
There are two ways to migrate your repositories:
- Direct Transition (Editing the Existing Repository)
- Change the target to “OCI Repository”.
- Update the URL as required (the repository name cannot be changed) and add a new robot account for helm project, check documentation above
- After saving, installed apps will automatically start using the updated repository.
Important limitation: OCI repositories must point directly to a single chart repository, not to a parent folder.
If your old repository included several charts (for example “bitbucket” and “jira”), then after switching to OCI you can only target one chart (e.g. “bitbucket”).
The other charts will no longer receive updates through this repo, and you will still need to create additional repositories for each individual chart.
- Add New Repositories One by One (Recommended), preserve the old one till the end. This approach allows a smooth transition while the old ChartMuseum repository continues to function. You can:
- Create a new OCI repository for each chart,
- Keep the old ChartMuseum repo enabled during the migration,
- Migrate applications gradually following the steps described here.
- This avoids disruptions and allows controlled migration.
- Special Case: Old Repo Targeting Multiple Chart Repos
If your existing repository targets multiple chart repositories and you need the new OCI setup to behave the same way, please contact support.
| Term | Meaning |
| Old Repository | The existing HTTP/HTTPS Harbor ChartMuseum repository. |
| New Repository | The new OCI-based Helm chart repository created for your project (e.g. `<chart-repo-name>` in `<pkey>-helm`). |
Why This Migration Is Required:
- ChartMuseum is deprecated.
- Applications deployed from old repos keep a reference to that repo inside their labels.
- Without updating the application to point to the new OCI repo, Rancher will not detect new chart versions from new repository.
Migration Steps:
- Create the New OCI Repository in Rancher
- Go to Apps → Repositories.
- Add a new repository of type OCI.
- Name it similarly to your old repo name (e.g. `<chart-repo-name>-oci`). You can't name it the same and can't rename it later.
- Point it to the new OCI endpoint.
- Disable the Old ChartMuseum Repository Temporarily
This step ensures that Rancher resolves charts from the new OCI repo.- Go to Apps → Repositories.
- Disable the old HTTP(S)-based repository.
- Keep it disabled until the migration is done.

- Update Existing Applications to Use the New OCI Repo
Applications deployed with the old repository still contain the old repo name in their metadata. You must upgrade them once to transition.- Go to Apps → Installed Apps.
- Open the application that was deployed using the old repo.
- Click Edit/Upgrade.

- In the list of available chart repositories (scroll to the bottom), select the new OCI repository. Or enter the chart name in search bar:

- Choose the chart version you want to deploy (same or newer).
- Click Upgrade.
- Re-enable the Old Repository (Optional)
If you still need the old repo for other apps, re-enable it after the migration steps above.
Note: Even if a newer chart version exists in the old repository, your migrated app will not see it, because it is no longer connected to that repo
If you want to move an app back to the old repository:
- Temporarily disable the new OCI repo.
- Enable the old ChartMuseum repo.
- Open the application → Upgrade.
- Select the chart from the old repo.
- Save.
This will reconnect the app to the old repository.
Automated deployments with Jenkins
In this section, we describe how to set-up automated builds, tests and deployments for Jenkins.
Prerequisites
In order to facilitate the connection between Jenkins and Rancher for the automatic deployments to be possible when a new software version is built, a new technical user to handle this action is required.
In case you don't have one, create a new technical user by following the instructions at Creating technical users.
Download kubeconfig
Connect to Rancher and navigate to your cluster, then in the right top menu, click "Download KubeConfig" as shown in the following image: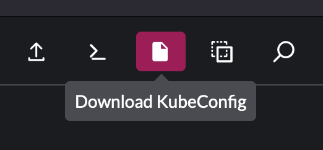
The downloaded kubeconfig file will have the same name as the cluster.
Deploy kubeconfig to Jenkins
In order to be able to automatically deploy your software using Jenkins, follow the next steps:
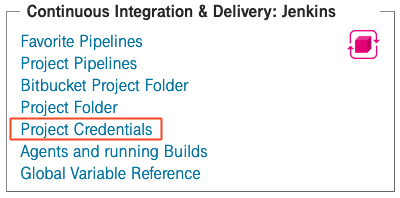
- Login to your DevOps Portal account and click "Project Credentials" in the "Continuous Integration & Delivery" section.
- Click "Add Credentials"
- Upload the kubeconfig file:
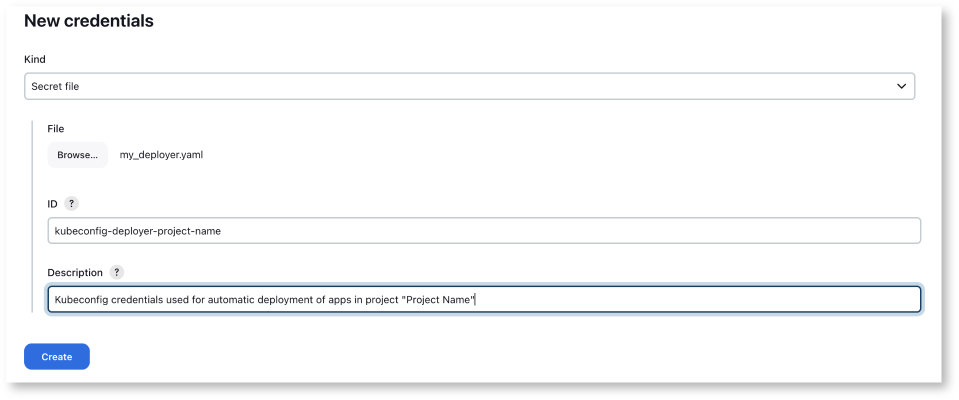
- Choose "Secret file" from "Kind" dropdown
- Click "Browse" and select your previously downloaded kubeconfig file
- The "ID" field will be used in parameterized pipelines. We propose the prefix "kubeconfig-deployer-" followed by the project name (if the project name contains spaces, please replace them with "-") in order to be consistent and to make a clear differentiation between credential destinations. In the end, this is our proposal and conduct to follow, but of course you are free to name the credentials as you decide it fits best in your organization.
- For the "Description" field we suggest to provide details about the destination and use of these credentials.
- At the end, click "Create"
Create a build and deploy pipeline
An application - more precisely, a helm chart - can now be built, tested and deployed automatically from Jenkins using the Jenkins Shared Library provided by DevOps-as-a-Service. Import the sdcloud library in your Jenkinsfile and call the sdcPipeline script, like shown in the following snippet:
sdcPipeline()
The example above will run the build & deploy pipeline with its default configuration, which means
- Only the build and test steps will be executed but the built helm chart won't be deployed. To also include the deployment step, set the deployHelmChart parameter to true:
sdcPipeline(deployHelmChart: true)
- The smoke test step expects a service responding with an HTTP 20x for a request sent to path "/" and port 80 using http. If your service uses different paths, ports, protocols, or arguments, set the corresponding sdcPipeline parameters containerProtocol, containerPort, containerContextPath, and containerArgs accordingly. E.g. to adapt the protocol and the context path, do
sdcPipeline(
containerPort: 8080,
containerContextPath: '/solarcalculator'
)
There is a lot more to customize. Please refer to the customization section of the Jenkins Shared Library documentation for the full list of parameters.